“It’s not the club's fault, Robert.”
That’s what I would often hear after I gently replaced (read: frustratingly slammed) my driver back into the bag after sending another ball spinning far right into the depths of the punitive side hill between #8’s fairway and #6’s black-tees tee box, into the (literal) graveyard on #15, or back onto #17’s fairway after teeing off on 18 at the Golf Club of Newport (Newport, NY).(“We just finished that one!”was another joke at my expense.)
What could solve my driving woes and help me find the short-grass off the tee more often?Maybe new equipment like a draw-biased driver or a different ball.While I’m not opposed to new gear, neither of these would solve the underlying problem. Perhaps I could aim so far left that I’m nearly perpendicular with the fairway – but that’s not going to fix it either.
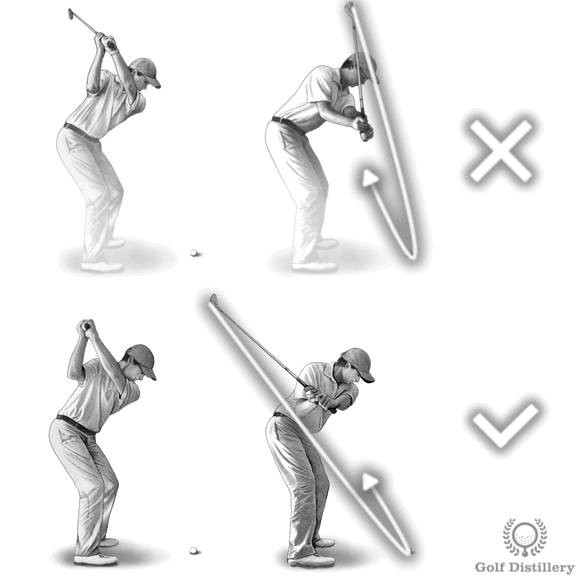
What I really needed was an adjustment to my swing technique in order to produce the Rory McIlroy–or Brooks Koepka-esque drives I was craving.A few lessons with a coach and a discussion or two with a trusted playing partner had me swinging with better weight shift, a shallower club path, and with more club face control. I may not have achieved 300 yard carries or 180+mph ball-speeds, but I was able to hit the ball further and with accuracy more consistently.Sweet relief!
How does this apply to soldering?A review and possible adjustment in technique can be all it takes to achieve the desired soldering results too.I frequently encounter situations where a solder user is discouraged and frustrated by the results they are currently achieving, so they come to Indium seeking support.They have tried everything; from new iron tips to new wire fluxes and different amounts of flux, to even ramping up the temperature beyond what is usually recommended – all without success.One of the first questions I ask is, "Can you send me a video of the process?"
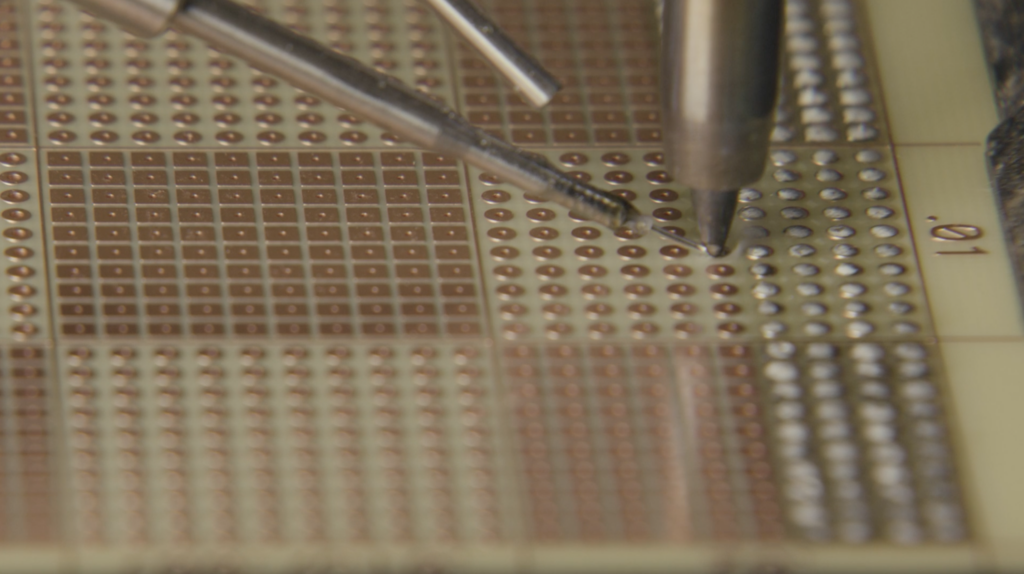
Upon receiving the video, the issue is spotted with the first 10 seconds and on the first or second joint; the wire is being fed to the wrong location on the soldering iron!This is equivalent to coming way over-the-top on the downswing–things can only go sideways afterwards.
Feeding wire into the middle of the soldering iron tip and expecting it to flow down to the solder joint creates a multitude of issues in the soldering process including:
- inconsistent joint formation
- poor hole fill
- solder flags
- skips/missed joints
- and flux build-up or charring, just to name a few.
In response, I’ll share my observation of the improper wire-to-iron tip introduction point and how it relates to the issues they’re having, then I’ll coach them on what a better technique would be.Ideally, the wire should be introduced in the location of the desired joint or only slightly up on the end of the iron tip (and only after a proper preheating period and possibly a pre-tinning) to promote the best soldering.As a result, the user may find that they now require less solder to create the joint, less time to joint completion, a lower tip temperature (which can result in energy savings over time), and less flux residue build-up meaning less frequent cycle times.All of which results in shortened cycle times and more productivity!

Whether it’s fixing a banana slice on the links or improving wire soldering productivity on an electronics assembly line, a simple review and adjustment in technique can provide amazing results.