Folks,
One of the great challenges of tin whiskers is detecting them. When one considers that their median thickness is in the 3 to 5 micron range (a human hair is about 75 microns,) they can be hard to see with direct lighting. Right angle lighting facilitates visual detection. See Figure 1. In this figure, Panashchenko shows that with direct light (left image), it is impossible to see the tin whisker, however with right angle light the tin whisker jumps out.
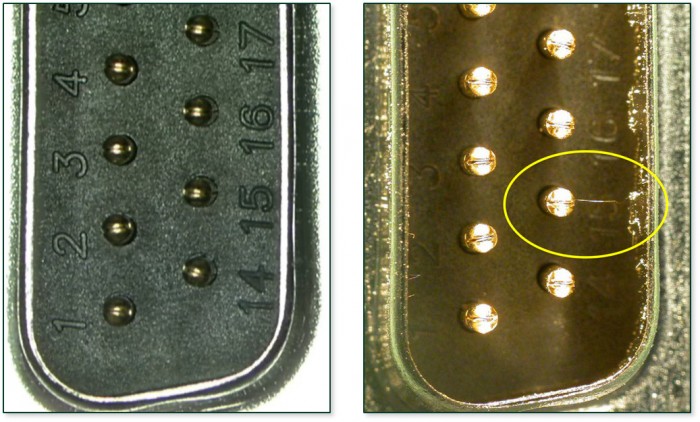
Figure 1. It is not possible to see the tin whisker with direct lighting as in the left image. However, in the right image, right angle lighting makes it easy to see the tin whisker. The image is from Panashchenko, Lyudmila (April 2012), “The Art of Metal Whisker Detection: A Practical Guide for Electronics Professionals,” IPC Tin Whisker Conference, Dallas TX, 41-42.
In her excellent presentation, “The Art of Metal Whisker Detection: A Practical Guide for Electronics Professionals,” Panashchenko offers these tips for identifying tin whiskers with a stereo optical microscope:
- Use a 3x to 100x stereo microscope
- Start with low magnification and work up to high magnification
- Have the ability to tilt the sample in 3 axes
- Use a flexible lamp that allows multiple angles of illumination, do not use a ring light
- Use a LED or fiber optic lighting, not incandescent lights which can cause shadowing
- Vary the brightness of the light source
The most important tip is to vary the angle of lighting while varying the magnification. Thus, analyzing a sample should take several minutes, at least. However, even the most thorough inspection may miss some tin whiskers.
In the next post, I will discuss mitigation techniques.
Cheers,
Dr. Ron